Deploying / Hosting Spring Boot applications on AWS using Elastic beanstalk for Free
Spring BootJuly 17, 20185 mins readAWS (Amazon Web Services) is the most widely used cloud computing platform all over the world. It provides a whole range of managed cloud services from S3 (Simple Storage Service) to Machine Learning to IOT.
In this article, you’ll learn how to deploy a Spring Boot application on AWS using Elastic beanstalk for free.
AWS comes with a free tier that lets new users experiment with its services for free for 1 year.
Every AWS resource that we’ll create in this article is eligible for AWS free tier. So you can confidently work with me step by step without worrying about pricing.
 Before proceeding to the next section, go ahead and sign up for AWS free tier. AWS will ask for your credit card information during the sign up process.
But don’t worry, they won’t charge anything unless you exceed the free tier limit. Also, you can delete your AWS account any time if you no longer need it.
Downloading the application to deploy on AWS
In this article, we’ll deploy a Spring boot and MySQL based Note-Taking application.
You can download the app from Github -
$ git clone https://github.com/callicoder/spring-boot-mysql-rest-api-tutorial.gitThere is also a tutorial on this blog that teaches you how to build this app from scratch.
I’ve chosen this app for deployment on AWS because It contains a Rest service as well as a database. So you can understand how to deploy a real-world app on AWS instead of some simple Hello World app.
Installing Elastic Beanstalk Command Line Interface (EB CLI)
Elastic Beanstalk CLI is a command line interface that lets you create, update and monitor Elastic Beanstalk environments, and deploy applications right from the terminal.
You can install Elastic Beanstalk CLI using Python’s Package management system, PIP. It comes bundled with Python version 3.x.x.
If Python 3.x.x is not installed in your system, then you can download and install it from Python’s download page.
You can check the current version of python and pip using the following commands -
$ python --version
Python 3.6.4
$ pip --version
pip 9.0.1 from /Users/rajeevkumarsingh/anaconda3/lib/python3.6/site-packages (python 3.6)Now, To install EB CLI using pip, Type the following command in your terminal -
$ pip install awsebcli --upgradeInitializing Elastic Beanstalk CLI and Creating an application
Let’s initialize our project with EB CLI and create an application. Fire up your terminal and go to the root directory of the project that you downloaded from Github in the previous section.
After that, type the following command to initialize the Elastic beanstalk CLI -
$ eb init

Select a default region
1) us-east-1 : US East (N. Virginia)
2) us-west-1 : US West (N. California)
3) us-west-2 : US West (Oregon)
4) eu-west-1 : EU (Ireland)
5) eu-central-1 : EU (Frankfurt)
6) ap-south-1 : Asia Pacific (Mumbai)
7) ap-southeast-1 : Asia Pacific (Singapore)
8) ap-southeast-2 : Asia Pacific (Sydney)
9) ap-northeast-1 : Asia Pacific (Tokyo)
10) ap-northeast-2 : Asia Pacific (Seoul)
11) sa-east-1 : South America (Sao Paulo)
12) cn-north-1 : China (Beijing)
13) us-east-2 : US East (Ohio)
14) ca-central-1 : Canada (Central)
15) eu-west-2 : EU (London)
(default is 3):
The default AWS region is 3. Let’s work with the default for now. Press enter to proceed to the next step -
You have not yet set up your credentials or your credentials are incorrect
You must provide your credentials.
(aws-access-id): <YOUR_AWS_ACCESS_ID>
(aws-secret-key): <YOUR_AWS_SECRET_KEY>
You need to enter your AWS AccessId and SecretKey. You can find them on your AWS Account.
The EB CLI creates a config file inside a hidden folder named .aws in your home directory, and stores the ACCESS_ID and SECRET_KEY in this file -
$ ls ~/.aws/configWhen you initialize an application next time, the CLI will directly use the credentials stored in the above config file instead of asking for them.
All right! So after entering the ACCESS_ID and SECRET_KEY, the EB CLI will display the following prompt:
Select an application to use
1) [ Create new Application ]
(default is 1):
Press enter to select the default option - Create new Application. You’ll then be asked to enter the application name -
Enter Application Name
(default is "spring-boot-mysql-rest-api-tutorial"): spring-boot-app
The default application name is the name of the current directory. Let’s change the application name to spring-boot-app and press enter.
You’ll now see the following
Application spring-boot-app has been created.

Select a platform.
1) Node.js
2) PHP
3) Python
4) Ruby
5) Tomcat
6) IIS
7) Docker
8) Multi-container Docker
9) GlassFish
10) Go
11) Java
12) Packer
(default is 1): 11
Type 11 to select Java and press enter -
Select a platform version.
1) Java 8
2) Java 7
(default is 1): 1
Enter 1 to select Java 8. You’ll get the following prompt after that -
Note: Elastic Beanstalk now supports AWS CodeCommit; a fully-managed source control service. To learn more, see Docs: https://aws.amazon.com/codecommit/
Do you wish to continue with CodeCommit? (y/N) (default is n):
We don’t want to use CodeCommit, so just press enter to continue. You’ll now get the following prompt -
Do you want to set up SSH for your instances?
(Y/n): Y
We might need to login to our EC2 instances. Let’s type Y to proceed with SSH setup.
Select a keypair.
1) [ Create new KeyPair ]
(default is 1): 1
Enter 1 to create a new SSH KeyPair -
Type a keypair name.
(Default is aws-eb): spring-boot-app-key
After entering the keypair name, You’ll get the following prompt.
Generating public/private rsa key pair.
Enter passphrase (empty for no passphrase):
Enter same passphrase again:
Type a passphrase or press enter for no passphrase.
Configuring the deployment of our Spring Boot application
After completing the above steps, Elastic beanstalk will create a configuration file in your project directory at the path .elasticbeanstalk/config.yml.
We need to configure elastic beanstalk to deploy our application as a packaged jar. Open .elasticbeanstalk/config.yml file and add a deploy config like so -
branch-defaults:
  master:
    environment: null
## Add the following deploy configuration
deploy:
  artifact: target/easy-notes-1.0.0.jar
global:
  application_name: spring-boot-app
  branch: null
  default_ec2_keyname: spring-boot-app-key
  default_platform: Java 8
  default_region: us-west-2
  include_git_submodules: true
  instance_profile: null
  platform_name: null
  platform_version: null
  profile: eb-cli
  repository: null
  sc: git
  workspace_type: Application
The easy-notes-1.0.0.jar is the artifact name of our application. It is created in the target folder when you package your application.
Let’s package the application by typing the following command -
$ mvn clean packageIt will create the artifact in the target folder -
$ ls target/easy-notes-1.0.0.jar
target/easy-notes-1.0.0.jar
Creating an Elastic Beanstalk Environment with an RDS database
An elastic beanstalk application can have multiple environments (e.g. staging, QA, prod).
Type the following command to create an Elastic beanstalk environment with a single EC2 instance and an RDS database -
$ eb create --single --database
Enter Environment Name
(default is spring-boot-app-dev):
The --single option is important. It tells EB CLI to create a single instance for running our application. Otherwise, Elastic beanstalk will create multiple instances with a load balancer. And that will cost you money :-)
The next prompt will display the following -
Enter DNS CNAME prefix
(default is spring-boot-app-dev):
Just press enter and proceed -
Enter an RDS DB username (default is "ebroot"): boot
Enter an RDS DB master password:
Retype password to confirm:
Enter a username and password for your RDS database in the above prompt.
EB CLI will now create your environment and display several logs like so -
Creating application version archive "app-41fb-180716_173651".
Uploading spring-boot-app/app-41fb-180716_173651.zip to S3. This may take a while.
Upload Complete.
Environment details for: spring-boot-app-dev
  Application name: spring-boot-app
  Region: us-west-2
  Deployed Version: app-41fb-180716_173651
  Environment ID: e-grmpd336k2
  Platform: arn:aws:elasticbeanstalk:us-west-2::platform/Java 8 running on 64bit Amazon Linux/2.7.2
  Tier: WebServer-Standard-1.0
  CNAME: spring-boot-app-dev.us-west-2.elasticbeanstalk.com
  Updated: 2018-07-16 12:07:06.528000+00:00
Printing Status:
INFO: createEnvironment is starting.
INFO: Using elasticbeanstalk-us-west-2-120931462184 as Amazon S3 storage bucket for environment data.
INFO: Created security group named: awseb-e-grmpd336k2-stack-AWSEBSecurityGroup-OR643345R86B
INFO: Creating RDS database named: aaf16jegytegm5. This may take a few minutes.
INFO: Created EIP: 34.217.199.203
 -- Events -- (safe to Ctrl+C)
The above process will take several minutes to complete. You can press Ctrl+C to quit, and check the current status of the environment by typing the following command -
$ eb status
Environment details for: spring-boot-app-dev
  Application name: spring-boot-app
  Region: us-west-2
  Deployed Version: None
  Environment ID: e-gm9sm7bvhr
  Platform: arn:aws:elasticbeanstalk:us-west-2::platform/Java 8 running on 64bit Amazon Linux/2.7.2
  Tier: WebServer-Standard-1.0
  CNAME: spring-boot-app-dev.us-west-2.elasticbeanstalk.com
  Updated: 2018-07-17 09:56:00.930000+00:00
  Status: Launching
  Health: Grey
The Status is Launching and Health is Grey. You can also type eb console command to open the elastic beanstalk console in your default web browser and check the progress from there.
Once the Status is Ready and Health turns Green, you can type eb logs to retrieve the application logs -
$ eb logsThe application logs will display the following error -
Caused by: com.mysql.jdbc.exceptions.jdbc4.MySQLNonTransientConnectionException: Could not create connection to database server.That’s because we didn’t configure Spring Boot to connect to the RDS database. It’s still trying to connect to a localhost mysql database. Let’s configure that now.
Configuring Environment properties for RDS database
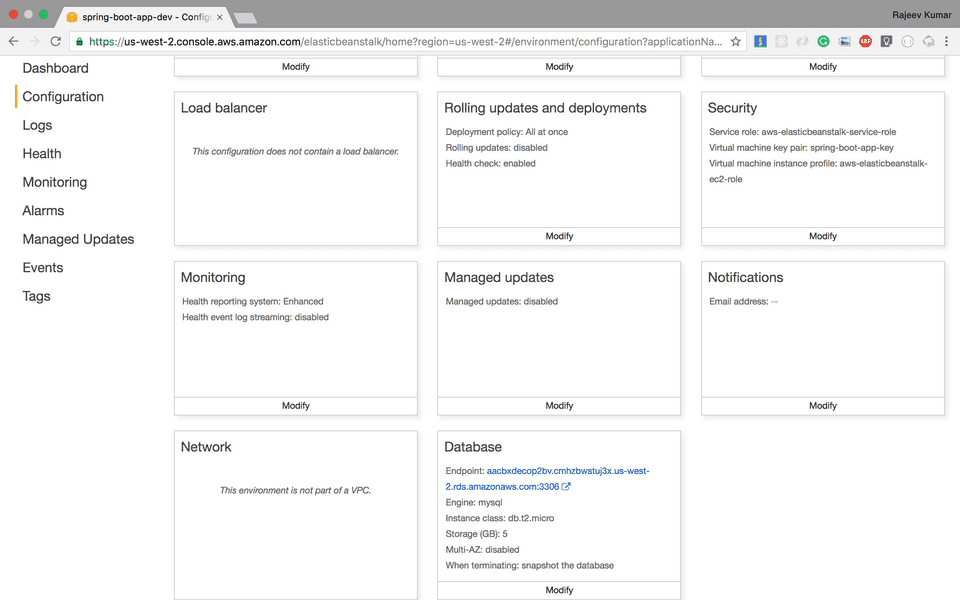
Let’s first find out the RDS database endpoint. Open the Elastic beanstalk console by typing the following command -
$ eb console
 The database endpoint is displayed in the Database section in your elastic beanstalk console configurations page.
You can now set the database URL, username and password in the elastic beanstalk environment like this -
$ eb setenv SPRING_DATASOURCE_URL=jdbc:mysql://aacbxdecop2bv.cmhzbwstuj3x.us-west-2.rds.amazonaws.com:3306/ebdb SPRING_DATASOURCE_USERNAME=boot SPRING_DATASOURCE_PASSWORD=<YOUR_PASSWORD>That’s it! The environment will update and the application will start on port 8080. You should see the following in web logs section of the eb logs response -
2018-07-17 11:01:55.124  INFO 9690 --- [           main] o.s.b.w.embedded.tomcat.TomcatWebServer  : Tomcat started on port(s): 8080 (http) with context path ''
2018-07-17 11:01:55.128  INFO 9690 --- [           main] c.e.easynotes.EasyNotesApplication       : Started EasyNotesApplication in 11.386 seconds (JVM running for 12.612)
Let’s open the application in the web browser by typing the following command -
$ eb openThe application will open in your default browser and display a 502 Bad Gateway error. Why you ask?
Well, Let’s check the logs again. Specially the logs titled /var/log/nginx/error.log -
type: post
-------------------------------------
/var/log/nginx/error.log
type: post
-------------------------------------
2018/07/17 10:24:16 [error] 3254#0: *1 connect() failed (111: Connection refused) while connecting to upstream, client: 131.221.192.25, server: , request: "GET / HTTP/1.1", upstream: "http://127.0.0.1:5000/", host: "34.218.27.206:80"
2018/07/17 11:11:35 [error] 9673#0: *1 connect() failed (111: Connection refused) while connecting to upstream, client: 79.132.201.115, server: , request: "GET / HTTP/1.1", upstream: "http://127.0.0.1:5000/", host: "34.218.27.206:80"
Your application runs behind an Nginx proxy server, and the Nginx server expects your application to run on port 5000 by default.
Configuring Spring Boot application PORT
There are two ways to configure your spring boot application to run on the default port 5000 expected by elastic beanstalk.
1. Set server.port property
Note that, Elastic beanstalk passes the port through a PORT environment variable. To listen on this port, add the following property to your src/main/resources/application.properties file -
# Listen on the port passed through `PORT` environment variable (Fallback to 8080)
server.port=${PORT:8080}
After setting the above property, you’ll need to package the application again with mvn clean package command. Once the application is packaged, type the following command to deploy it -
$ eb deploy2. Set SERVER_PORT environment variable
You can also set an environment variable called SERVER_PORT to run the spring boot application on that port -
$ eb setenv SERVER_PORT=5000Congratulations! The Application is Deployed
Our application is now deployed on AWS. You can type the following command to open it in your default browser -
$ eb openYou can explore various REST APIs exposed by the application. Check out the Github Readme to know more about those APIs.
