Hibernate is the most popular Object Relational Mapping (ORM) tool for Java. It implements Java Persistence API (JPA) specifications and has a huge industry adoption.
Hibernate maps the tables in your database to the Entity classes in your application.
You can define relationships among these entities in the same way you define relationships among the tables in your database.
In this tutorial, You’ll learn how to define a one-to-one relationship between two entities using JPA and Hibernate.
Let’s consider an application that stores a lot of information about its users so that it can provide a personalized experience to them.
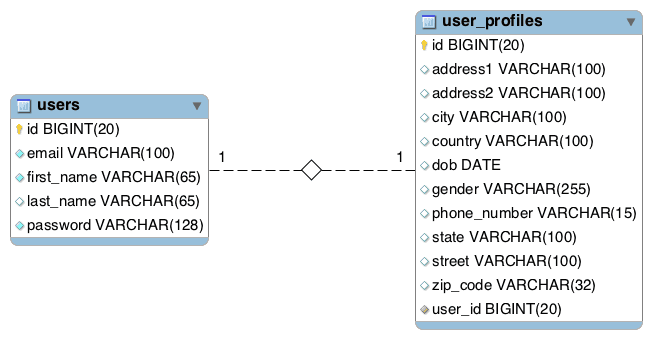
In such cases, it makes sense to store users primary details like name, email, password in a USERS table and store all the other secondary details in a separate table called USER_PROFILES, and have a one-to-one relationship between USERS and USER_PROFILES table.
Following is a visual of such a database schema -
The users and user_profiles tables exhibit a one-to-one relationship between each other. The relationship is mapped using a foreign key called user_id in the user_profiles table.
In this article, we’ll create a project from scratch and learn how to go about implementing such one-to-one relationship at the object level using JPA and Hibernate.
Let’s get started!
Creating the Project
Let’s use Spring Boot CLI to generate the Project. It’s the quickest way to bootstrap a Spring Boot project.
Fire up your terminal and type the following command to generate the project -
spring init -n=jpa-one-to-one-demo -d=web,jpa,mysql --package-name=com.example.jpa jpa-one-to-one-demoAlternatively, You can generate the project from Spring Initializr web tool by following the instructions below -
- Head over to http://start.spring.io
- Enter Artifact as “jpa-one-to-one-demo”
- Click Options dropdown to see all the options related to project metadata.
- Change Package Name to “com.example.jpa”
- Select Web, JPA and Mysql dependencies.
- Click Generate to generate and download the project.
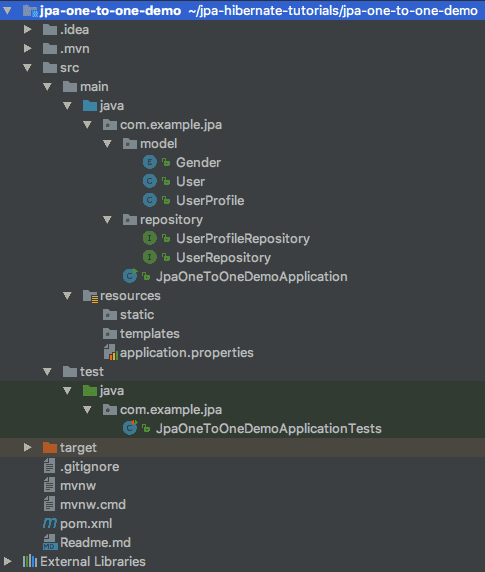
Following is the directory structure of the project for your reference -
Note that, the project you bootstrapped using one of the above methods won’t have model and repository packages and all the classes inside these packages at this point. But don’t worry, We’ll create them shortly.
Configuring the Database and Log levels
Since we’re using MySQL database, we need to configure the database URL, username, and password. Open src/main/resources/application.properties file and add the following properties -
# DATASOURCE (DataSourceAutoConfiguration & DataSourceProperties)
spring.datasource.url=jdbc:mysql://localhost:3306/jpa_one_to_one_demo?useSSL=false&serverTimezone=UTC&useLegacyDatetimeCode=false
spring.datasource.username=root
spring.datasource.password=root

# Hibernate

# The SQL dialect makes Hibernate generate better SQL for the chosen database
spring.jpa.properties.hibernate.dialect = org.hibernate.dialect.MySQL5InnoDBDialect

# Hibernate ddl auto (create, create-drop, validate, update)
spring.jpa.hibernate.ddl-auto = update

logging.level.org.hibernate.SQL=DEBUG
logging.level.org.hibernate.type=TRACE
The hibernate property spring.jpa.hibernate.ddl-auto = update will automatically create/update the database tables as per the entity classes in your project on application startup.
The logging properties will help us debug SQL statements executed by hibernate.
Don’t forget to change spring.datasource.username and spring.datasource.password as per your MySQL installation. Also, Please create a database named jpa_one_to_one_demo before proceeding to the next section.
Defining the Entities
Let’s now define the entity classes that will be mapped to the tables we saw earlier.
1. User Entity
Create a new package called model inside com.example.jpa package and then create the User class inside model package with the following contents -
package com.example.jpa.model;

import javax.persistence.*;
import javax.validation.constraints.NotNull;
import javax.validation.constraints.Size;
import javax.validation.constraints.Email;
import java.io.Serializable;

@Entity
@Table(name = "users")
public class User implements Serializable {
    @Id
    @GeneratedValue(strategy = GenerationType.IDENTITY)
    private Long id;

    @NotNull
    @Size(max = 65)
    @Column(name = "first_name")
    private String firstName;

    @Size(max = 65)
    @Column(name = "last_name")
    private String lastName;

    @NotNull
    @Email
    @Size(max = 100)
    @Column(unique = true)
    private String email;

    @NotNull
    @Size(max = 128)
    private String password;

    @OneToOne(fetch = FetchType.LAZY,
            cascade =  CascadeType.ALL,
            mappedBy = "user")
    private UserProfile userProfile;

    // Hibernate requires a no-arg constructor
    public User() {

    }

    public User(String firstName, String lastName, String email, String password) {
        this.firstName = firstName;
        this.lastName = lastName;
        this.email = email;
        this.password = password;
    }

    // Getters and Setters (Omitted for brevity)
}
2. Gender Enum
The Gender enum will be used in the UserProfile class to store the gender information of users. Create Gender.java inside com.example.jpa.model package with the following contents -
package com.example.jpa.model;

public enum Gender {
    MALE,
    FEMALE
}
3. UserProfile Entity
Finally, Create the UserProfile class inside com.example.jpa.model package with the following contents -
package com.example.jpa.model;

import javax.persistence.*;
import javax.validation.constraints.Size;
import java.io.Serializable;
import java.util.Date;

@Entity
@Table(name = "user_profiles")
public class UserProfile implements Serializable {
    @Id
    @GeneratedValue(strategy = GenerationType.IDENTITY)
    private Long id;

    @Column(name = "phone_number")
    @Size(max = 15)
    private String phoneNumber;

    @Enumerated(EnumType.STRING)
    @Column(length = 10)
    private Gender gender;

    @Temporal(TemporalType.DATE)
    @Column(name = "dob")
    private Date dateOfBirth;

    @Size(max = 100)
    private String address1;

    @Size(max = 100)
    private String address2;

    @Size(max = 100)
    private String street;

    @Size(max = 100)
    private String city;

    @Size(max = 100)
    private String state;

    @Size(max = 100)
    private String country;

    @Column(name = "zip_code")
    @Size(max = 32)
    private String zipCode;

    @OneToOne(fetch = FetchType.LAZY, optional = false)
    @JoinColumn(name = "user_id", nullable = false)
    private User user;

    public UserProfile() {

    }

    public UserProfile(String phoneNumber, Gender gender, Date dateOfBirth,
                       String address1, String address2, String street, String city,
                       String state, String country, String zipCode) {
        this.phoneNumber = phoneNumber;
        this.gender = gender;
        this.dateOfBirth = dateOfBirth;
        this.address1 = address1;
        this.address2 = address2;
        this.street = street;
        this.city = city;
        this.state = state;
        this.country = country;
        this.zipCode = zipCode;
    }

    // Getters and Setters (Omitted for brevity)
}
Let’s now understand how the above entity classes define a one-to-one relationship.
A one-to-one relationship is defined using JPA’s @OneToOne annotation. It accepts several attributes. Let’s understand what those attributes are meant for -
fetch = FetchType.LAZY - Fetch the related entity lazily from the database.
cascade = CascadeType.ALL - Apply all cascading effects to the related entity. That is, whenever we update/delete a
Userentity, update/delete the correspondingUserProfileas well.mappedBy = “user” - We use mappedBy attribute in the
Userentity to tell hibernate that theUserentity is not responsible for this relationship and It should look for a field nameduserin theUserProfileentity to find the configuration for the JoinColumn/ForeignKey column.
In a bi-directional relationship, we specify @OneToOne annotation on both the entities but only one entity is the owner of the relationship. Most often, the child entity is the owner of the relationship and the parent entity is the inverse side of the relationship.
The owner of the relationship contains a @JoinColumn annotation to specify the foreign key column, and the inverse-side of the relationship contains a mappedBy attribute to indicate that the relationship is mapped by the other entity.
Defining the Repositories
Finally, Let’s define the Repositories for accessing the User and UserProfile details from the database.
We’ll extend the repositories from Spring-Data-JPA’s JpaRepository interface. Spring Data JPA already contains an implementation of JpaRepository interface called SimpleJpaRepository which is plugged in at runtime.
1. UserRepository
Create a new package called repository inside com.example.jpa package and then create the following interface inside repository package -
package com.example.jpa.repository;

import com.example.jpa.model.User;
import org.springframework.data.jpa.repository.JpaRepository;
import org.springframework.stereotype.Repository;

@Repository
public interface UserRepository extends JpaRepository<User, Long> {

}
2. UserProfileRepository
Create an interface named UserProfileRepository inside com.example.jpa package with the following contents -
package com.example.jpa.repository;

import com.example.jpa.model.UserProfile;
import org.springframework.data.jpa.repository.JpaRepository;
import org.springframework.stereotype.Repository;

@Repository
public interface UserProfileRepository extends JpaRepository<UserProfile, Long> {

}
That’s all we need to do in the repository layer. Thanks to SimpleJpaRepository, We can perform all the CRUD operations on the User and UserProfile entities without implementing anything.
Writing code to test the one-to-one Mapping
Let’s now write some code to test our setup. Open JpaOneToOneDemoApplication.java file and replace it with the following code -
package com.example.jpa;

import com.example.jpa.model.Gender;
import com.example.jpa.model.User;
import com.example.jpa.model.UserProfile;
import com.example.jpa.repository.UserRepository;
import com.example.jpa.repository.UserProfileRepository;
import org.springframework.beans.factory.annotation.Autowired;
import org.springframework.boot.CommandLineRunner;
import org.springframework.boot.SpringApplication;
import org.springframework.boot.autoconfigure.SpringBootApplication;
import java.util.Calendar;

@SpringBootApplication
public class JpaOneToOneDemoApplication implements CommandLineRunner {

    @Autowired
    private UserRepository userRepository;

    @Autowired
    private UserProfileRepository userProfileRepository;

    public static void main(String[] args) {
        SpringApplication.run(JpaOneToOneDemoApplication.class, args);
    }

    @Override
    public void run(String... args) throws Exception {
        // Clean up database tables
        userProfileRepository.deleteAllInBatch();
        userRepository.deleteAllInBatch();

        //=========================================

        // Create a User instance
        User user = new User("Rajeev", "Singh", "rajeev@callicoder.com",
                "MY_SUPER_SECRET_PASSWORD");

        Calendar dateOfBirth = Calendar.getInstance();
        dateOfBirth.set(1992, 7, 21);

        // Create a UserProfile instance
        UserProfile userProfile = new UserProfile("+91-8197882053", Gender.MALE, dateOfBirth.getTime(),
                "747", "2nd Cross", "Golf View Road, Kodihalli", "Bangalore",
                "Karnataka", "India", "560008");


        // Set child reference(userProfile) in parent entity(user)
        user.setUserProfile(userProfile);

        // Set parent reference(user) in child entity(userProfile)
        userProfile.setUser(user);

        // Save Parent Reference (which will save the child as well)
        userRepository.save(user);

        //=========================================
    }
}
I’ve implemented the CommandLineRunner interface in the main class. You can use it to run some code once the application has started. All the code of interest is in the run() method.
We first clean-up both the User and UserProfile tables, and then insert a User and the corresponding UserProfile object in the database.
Time to Run the Application
Open your terminal and type the following command from the root directory of the project to run the application -
mvn spring-boot:runYou can check the logs for debugging what statements are executed by hibernate. Hibernate executes the following SQL statements for performing the tasks that we have specified in the run() method -
org.hibernate.SQL : delete from user_profiles
org.hibernate.SQL : delete from users
org.hibernate.SQL : insert into users (email, first_name, last_name, password) values (?, ?, ?, ?)
org.hibernate.SQL : insert into user_profiles (address1, address2, city, country, dob, gender, phone_number, state, street, user_id, zip_code) values (?, ?, ?, ?, ?, ?, ?, ?, ?, ?, ?)
Conclusion
That’s All Folks! In this article, you learned how to map a one-to-one database relationship at the object level in you program using JPA and Hibernate.
You can find the source code for the sample project that we build in this article in my jpa-hibernate-tutorials github repository.
Consider giving a star on github if you find the project useful. Also, Don’t forget to share this post with your friends and colleagues.
You might also wanna check out the following articles on JPA Mapping -
JPA / Hibernate One to Many mapping Example with Spring Boot
JPA / Hibernate Many to Many mapping Example with Spring Boot
Thanks for reading. See you next time! :)


