Spring Boot @ConfigurationProperties: Binding external configurations to POJO classes
Spring BootAugust 31, 20183 mins readExternal configurations allow you to work with the same code in different environments. They also provide you the flexibility to tune your application from a single place.
In this article, you’ll learn how to define and use external configurations in Spring Boot with a very simple annotation based API called @ConfigurationProperties.
@ConfigurationProperties bind external configurations to a strongly typed bean in your application code. You can inject and use this bean throughout your application code just like any other spring bean.
Let the exploring begin!
Creating the Application
Let’s create a sample application to learn how to define and use external configurations in spring boot.
We’ll use Spring Boot CLI to initialize the project. Fire up your terminal and type the following command to generate the project -
spring init --dependencies=web,validation --name=config-properties-demo --package-name=com.example.demo config-properties-demoAlternatively, You may also bootstrap the application from Spring Initializr website by following the instructions below -
- Go to http://start.spring.io
- Enter
config-properties-demoin the Artifact field. - Set Package name to
com.example.demo - Add
WebandValidationin the dependencies section. - Click Generate Project to download the project.
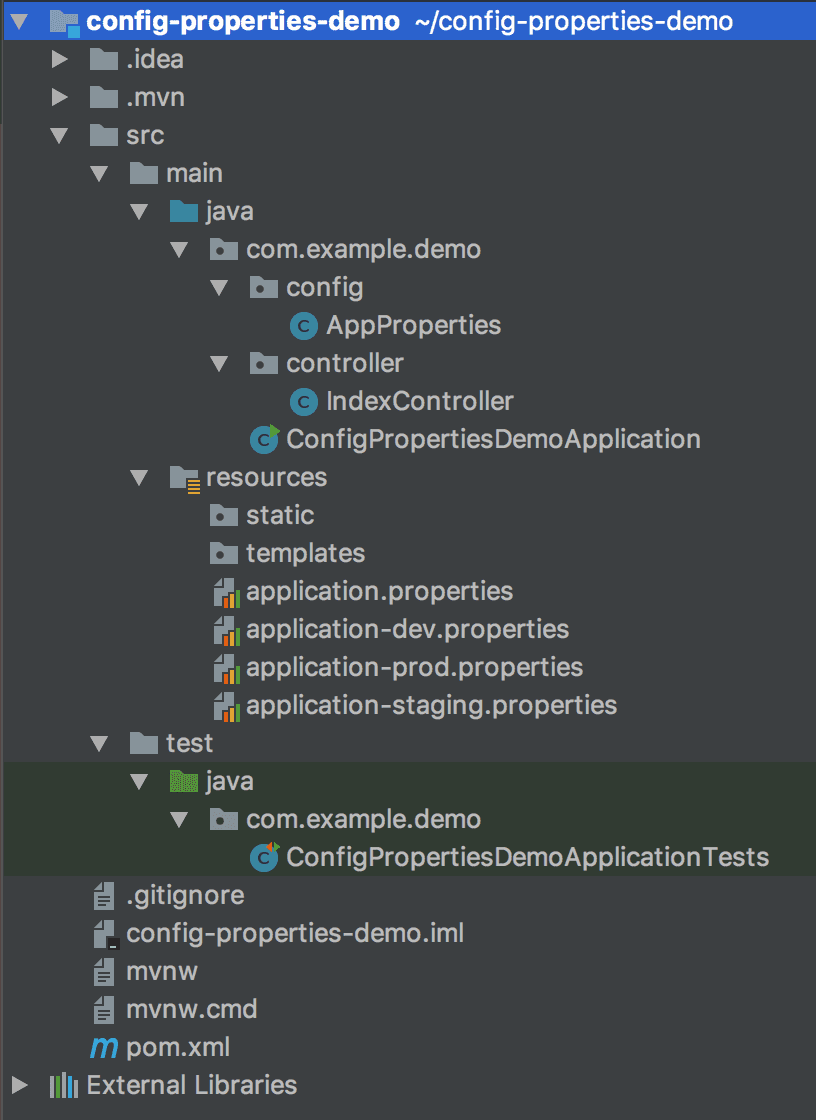
Following is the directory structure of the complete application for your reference-
Defining Properties
Spring Boot application loads configuration properties from application.properties file located in the classpath by default.
Open src/main/resources/application.properties file and add the following properties to it -
## Top level app properties
app.name=ConfigurationPropertiesDemoApp
app.description=${app.name} is a spring boot app that demonstrates how to use external configuration properties
app.upload-dir=/uploads

app.connect-timeout=500ms
app.read-timeout=10s

## Nested Object Properties (security)
app.security.username=callicoder
app.security.password=123456
app.security.roles=USER,ADMIN,PARTNER   # List Property
app.security.enabled=true

## Map Properties (permissions)
app.security.permissions.CAN_VIEW_POSTS=true
app.security.permissions.CAN_EDIT_POSTS=true
app.security.permissions.CAN_DELETE_POSTS=false
app.security.permissions.CAN_VIEW_USERS=true
app.security.permissions.CAN_EDIT_USERS=true
app.security.permissions.CAN_DELETE_USERS=false
Binding external properties to a POJO class using @ConfigurationProperties
Let’s now see how we can bind the properties defined in the application.properties file to a POJO class using @ConfigurationProperties.
The @ConfigurationProperties annotation takes a prefix parameter, and binds all the properties with the specified prefix to the POJO class -
package com.example.demo.config;

import org.springframework.boot.context.properties.ConfigurationProperties;
import org.springframework.boot.convert.DurationUnit;

import java.time.Duration;
import java.time.temporal.ChronoUnit;
import java.util.ArrayList;
import java.util.HashMap;
import java.util.List;
import java.util.Map;

@ConfigurationProperties(prefix = "app")
public class AppProperties {
    private String name;
    private String description;
    private String uploadDir;
    private Duration connectTimeout = Duration.ofMillis(1000);
    @DurationUnit(ChronoUnit.SECONDS)
    private Duration readTimeout = Duration.ofSeconds(30);
    private final Security security = new Security();

    // Getters and Setters (Omitted for brevity)

    public static class Security {
        private String username;
        private String password;
        private List<String> roles = new ArrayList<>();
        private boolean enabled;
        private Map<String, String> permissions = new HashMap<>();

        // Getters and Setters (Omitted for brevity)
    }
}
Let’s understand a few details about the binding:
Type-safe binding (List and Map)
Notice how the comma separated
rolesin the properties file are bound to aListof roles and thepermissionsare bound to aMap.Duration Support
Also, note how the duration properties are safely bound to the
Durationtypes. This is so awesome. Spring Boot allows you to specify durations with the following units in theapplication.propertiesfiles -nsfor nanosecondsusfor microsecondsmsfor millisecondssfor secondsmfor minuteshfor hoursdfor daysThe default unit is
milliseconds. So if you don’t specify any unit in the properties file, It will be considered asmilliseconds.Note that, you can also override the unit using
@DurationUnitannotation as we have done in the above POJO class.
Naming Convention
All the kebab case property names (ex: upload-dir) are bound to the corresponding camel case fields (ex: uploadDir) in the POJO class.
Note that the properties can also be specified in camel case. But using kebab case is recommended.
Enabling Configuration Properties
You need to explicitly register the properties classes using the @EnableConfigurationProperties annotation as shown in the following example.
package com.example.demo;

import com.example.demo.config.AppProperties;
import org.springframework.boot.SpringApplication;
import org.springframework.boot.autoconfigure.SpringBootApplication;
import org.springframework.boot.context.properties.EnableConfigurationProperties;

@SpringBootApplication
@EnableConfigurationProperties(AppProperties.class)
public class ConfigPropertiesDemoApplication {

	public static void main(String[] args) {
		SpringApplication.run(ConfigPropertiesDemoApplication.class, args);
	}
}
Alternatively, you could also add a @Component annotation to the AppProperties class and the binding would still work.
Injecting Configuration Properties in your Spring Beans
The @ConfigurationProperties classes are regular spring beans, and you can inject them in the same way as any other bean.
In the following example, I’ve written a sample API that retrieves app details from configuration properties and returns them to the client -
package com.example.demo.controller;

import com.example.demo.config.AppProperties;
import org.springframework.beans.factory.annotation.Autowired;
import org.springframework.web.bind.annotation.GetMapping;
import org.springframework.web.bind.annotation.RestController;

import java.util.HashMap;
import java.util.Map;

@RestController
public class IndexController {

    // Injecting ConfigurationProperties in your Beans
    @Autowired
    private AppProperties appProperties;

    @GetMapping("/")
    public Map<String, String> getAppDetails() {
        Map<String, String> appDetails = new HashMap<>();
        appDetails.put("name", appProperties.getName());
        appDetails.put("description", appProperties.getDescription());

        return appDetails;
    }
}
@ConfigurationProperties Validation
You can validate configuration properties using javax.validation constraints like @NotNull, @NotEmpty etc.
To enable validation, you just need to add Spring’s @Validated annotation to the @ConfigurationProperties class -
package com.example.demo.config;

import org.springframework.boot.context.properties.ConfigurationProperties;
import org.springframework.boot.convert.DurationUnit;
import org.springframework.validation.annotation.Validated;

import javax.validation.Valid;
import javax.validation.constraints.NotEmpty;
import javax.validation.constraints.NotNull;
import java.time.Duration;
import java.time.temporal.ChronoUnit;
import java.util.ArrayList;
import java.util.HashMap;
import java.util.List;
import java.util.Map;

@ConfigurationProperties(prefix = "app")
@Validated
public class AppProperties {
    @NotNull
    private String name;
    private String description;
    private String uploadDir;
    private Duration connectTimeout = Duration.ofMillis(1000);
    @DurationUnit(ChronoUnit.SECONDS)
    private Duration readTimeout = Duration.ofSeconds(30);
    @Valid
    private final Security security = new Security();

    // Getters and Setters (Omitted for brevity)

    public static class Security {
        private String username;
        private String password;
        @NotEmpty
        private List<String> roles = new ArrayList<>();
        private boolean enabled;
        private Map<String, String> permissions = new HashMap<>();

        // Getters and Setters (Omitted for brevity)
    }
}
Now, The Spring Boot application will throw a validation exception on startup, if the name property is null or the security.roles property is empty.
Environment based (Profile specific) Configuration Properties
In addition to the standard application.properties file, Spring Boot also allows you to define profile-specific properties with the following naming convention -
application-{profile}.propertiesThe profile specific property files are loaded from the same location as the application.properties file, with profile-specific properties always overriding the default ones.
To illustrate this, Let’s define some profile-specific property files, and override some of the default properties -
application-dev.properties
## Override properties for dev environment
app.name=ConfigurationPropertiesDemoApp-DEVELOPMENT

app.security.username=callicoder-dev
application-staging.properties
## Override properties for staging environment
app.name=ConfigurationPropertiesDemoApp-STAGING

app.security.username=callicoder-staging
app.security.password=C@ll1C0d3r
application-prod.properties
## Override properties for prod environment
app.name=ConfigurationPropertiesDemoApp-PRODUCTION

app.security.username=callicoder-prod
app.security.password=C@ll1C0d3r
Now, we need to activate a spring profile so that the corresponding properties file is loaded by spring boot.
Activating a Spring Profile
You can set active profiles in many ways -
Using application properties
The default
application.propertiesfile is always loaded by Spring Boot. You can set active profiles in theapplication.propertiesfile by adding the following property -spring.profiles.active=stagingAfter adding the above property, Spring Boot will load
application-staging.propertiesfile as well, and override properties with the new values specified there.Using command line argument
You can set active profiles on startup by providing the
spring.profiles.activecommand line argument like this -# Packaging the app mvn clean package -Dspring.profiles.active=staging # Running the packaged jar with `spring.profiles.active` argument java -jar -Dspring.profiles.active=staging target/config-properties-demo-0.0.1-SNAPSHOT.jarMoreover, Here is how you can set active profiles while running the application with
spring-boot:runcommand -mvn spring-boot:run -Dspring.profiles.active=devUsing environment variable
Lastly, you can also set active profiles using the
SPRING_PROFILES_ACTIVEenvironment variable-export SPRING_PROFILES_ACTIVE=prod
Running the application
Let’s run the application and access the sample Rest API to see configuration properties in action -
mvn spring-boot:run$ curl http://localhost:8080
{"name":"ConfigurationPropertiesDemoApp","description":"ConfigurationPropertiesDemoApp is a spring boot app that demonstrates how to use external configuration properties"}Running the application with active profiles set to prod
mvn spring-boot:run -Dspring.profiles.active=prod$ curl http://localhost:8080
{"name":"ConfigurationPropertiesDemoApp-PRODUCTION","description":"ConfigurationPropertiesDemoApp-PRODUCTION is a spring boot app that demonstrates how to use external configuration properties"}Conclusion
@ConfigurationProperties are a really nice way to bind external configurations in a type-safe manner. I use this feature in almost all my projects. Moreover, Spring Boot’s auto-configurations also rely on configuration properties.
Let me know what do you think about this feature in the comment section below.
As always, You can find the complete demo project that we built in this article in the Github Repository.
Until next time…

